Sunday, December 25, 2011

Day 25: Merry Christmas from our house to yours!


Merry Christmas to you all! The anticipation and excitement is finally here. The 25 days of Christmas has been so much fun and its so great getting feedback from you all about different projects you are making or ones that you just really like. I am so thankful for all of your love and support. THANK YOU from the bottom of my heart!!!


I just love our tree this year and Christmas time is so kozy in our house. I love to just grab a good cup of tea or cocoa and snuggle up under a quilt and knit. 


Joy to the world!


This is Elfy. He was a gift from the Howe girls for Stella. We only let Stella look at Elfy and not play with him otherwise he would be destroyed.


I am spending Christmas at home with my family. They are the greatest!

Merry Christmas to you all! I hope you have a joyous holiday and spend time with the ones you love. You will be hearing from me shortly. I am taking this week off to enjoy time with my husband and relax :)


Saturday, December 24, 2011

Day 24: Ornament Wreath


Wow!!! I love how this turned out. Its so shiny and blingy I love it so much :) This is definitely an eye stopper. 

Let me tell you this wreath takes alot of time and ornaments, like a couple hundred!!

Supplies:
  • Ornaments (ALOT) - all sizes
  • Styrofoam wreath - any size
  • glue gun/glue (ALOT)
  • ribbon

Check out the tutorial I found HERE on how to make this stunning wreath.

Merry Christmas Eve to you all! Hoping you all have a chance to spend time with family and friends. I am at home with my family and wouldn't want to be anywhere else. I love coming home :)

Enjoy! See you tomorrow :)


Friday, December 23, 2011

Day 23: Rolo Cookies


These are my all time favorite cookie. I love this time of year because my mom always makes these for me. Oh the best part is when the middle is still gooey and they just melt in your mouth. Yum :)

Rolo Cookies

2 1/2 cups flour
3/4 cup unsweetened cocoa
1 teaspoon baking soda
1 cup sugar
1 cup brown sugar
1 cup butter/margarine
2 teaspoons vanilla
2 eggs
1 cup chopped pecans
28 rolo candies
1 tablespoon sugar
4 ounces almond bark/white chocolate

Preheat oven to 375 degrees. Lightly spoon flour into measuring cup and level off. In a small bowl, combine flour, cocoa and baking soda. Blend well. In a large bowl beat 1 cup sugar, brown sugar and margarine until light and fluffy. Add vanilla and eggs, beat well. Add flour mixture. Stir in half the pecans. Shape 1 tablespoon dough around 1 rolo, covering completely. In a small bowl, combine remaining 1/2 pecans and 1 tablespoon sugar. Press one side of cookie in sugar mixture. Place on cookie sheet. Bake at 375 degrees for 7 to 8 minutes. Melt candy coating and drizzle over cookies.

Anyone traveling for the holidays travel safe and enjoy time with your family and friends.

Enjoy! See you tomorrow :)

Thursday, December 22, 2011

Day 22: Flat Iron Cover


I already have a flat iron cover but definitely not as cute as this one :) I stumbled upon this one through a blog that I follow. Its so fast and easy and a great way to use up scrap fabric. Don't mind my Chi flat iron it gets ALOT of use. Best thing ever! And no I am not getting any perks for expressing my love for my Chi ;)

You can find out how to make your very own flat iron cover HERE!

Supplies:
  • fabric (I used all scraps)
  • Insul-Bright
  • Cutting Mat/Ruler
  • Rotary cutter
  • Sewing machine/thread

So pretty!


Enjoy! See you tomorrow :)

Wednesday, December 21, 2011

Day 21: Pecan Rum Bars


These are melt in your mouth ooey gooey Delicious! I love making these for Christmas because they always turn out great and are so easy to make. Having people over for the holidays or going somewhere, whip up these treats and I promise everyone will enjoy!

Pecan Rum Bars

Ingredients

Crust
1 cup butter, softened
1 cup packed brown sugar
2 cups all-purpose flour

Filling
2 eggs
1/2 cup packed brown sugar
1/2 cup dark corn syrup
1 tablespoon rum or 1 teaspoon rum extract (bring out the booze)
2 cups pecan halves

Icing (optional-I never put the icing on and they turn out so gooey anyways)
1/2 cup powdered sugar
1 tablespoon butter, softened
2 teaspoons rum or 1/2 teaspoon rum extract plus 2 teaspoons water

Directions

Heat oven to 375 degrees. Grease bottom and sides of 9x13'' pan with shortening or cooking spray (do not use dark pan)
In medium bowl, beat 1 cup butter and 1 cup brown sugar with electric mixer on low speed  until creamy. Stir in flour. Press evenly in pan.
Bake 12 to 14 minutes or until edges are golden brown and center springs back when touched lightly.
Meanwhile, in medium bowl, mix all filling ingredients except pecans. Stir in pecans. Pour over crust, spreading pecans evenly.
Bake 12 to 15 minutes or until filling is set. Cool completely, about 1 hour.
In small bowl, mixing icing ingredients (add additional rum or water, 1/2 teaspoon at a time, if icing is too thick to drizzle). Drizzle icing over bars. Cut and Enjoy!

See you tomorrow :)

Tuesday, December 20, 2011

Day 20: Hair Accessories...bobby pins and headbands

Aren't these just adorable! These would be great gifts for your girlfriends, daughters, nieces, granddaughters, ect. Also great stocking stuffers or for any occasion. I just love all the DIY ideas out there. I have really been pushing on being very thrifty and trying to save a buck.

BRAIDED FLOWER HEADBANDS


Supplies:
  • elastic headbands
  • fabric (use up those scraps)
  • felt
  • glue gun/glue
  • sewing machine/thread (optional)

I found this great step by step tutorial HERE

The only thing I did differently is I just used hot glue to hold my braids together instead of sewing it with a needle.


LACE FLORAL BOBBY PINS


These are so easy and simple to put together and can really dress up your look.

Supplies:

  • lace
  • bobby pins (I found mine at Hobby Lobby)
  • buttons 
  • glue gun/glue
  • felt
  • scissors

Start out by cutting a circle with your felt. I cut mine slightly larger than quarter size. Add glue to the outer end of your felt and continue in a circle until you end up in the middle. At this point you could leave your flower with just the lace or you can add a button for some embellishment. Once you have completed the top done, glue your bobby pin to the back of your flower. 


VINTAGE BOBBY PINS


I love love these! Check out the tutorial to make these VINTAGE BOBBY PINS and to make your own Yo-Yos check it out HERE.

Enjoy! See you tomorrow :)

Monday, December 19, 2011

Day 19: Stockings


The stockings are hung and ready for Christmas!

I found this Christmas Stocking TUTORIAL on Pinterest and I love how it turned out. This one I made for Matt. The fabric is so much fun, I actually made an apron out of it as well for myself :)

Supplies:

  • printable stocking pattern (found here)
  • fabric
  • batting (optional)
  • sewing machine/thread
  • scissors/rotary cutter/cutting mat

I did change a few things from the tutorial. I added fabric for inside and also added some batting to give it some extra thickness, plus it makes it a little more durable to hold presents. (If you decided to add the extra layers just remember to layer the outside fabrics right sides together, then your batting and your inside fabric should be facing right side up). The stocking was fairly easy to put together. The cuff was a little more difficult than I thought. But that may just be me.

I have mine and Stella's yet to make. Have fun making yours!

Enjoy! See you tomorrow :)

Sunday, December 18, 2011

Day 18: Paperback Christmas Trees

Can you believe it there is only 1WEEK left until Christmas. I am excited and not so much at the same time. It always goes way too fast to enjoy. But I can't wait to share time with the people I love :)

I stumbled upon this great Paperback Christmas Tree project on Pinterest. These are so quick and easy to make.


Here is the TUTORIAL for step by step instructions. And it seriously will only take you maybe a half hour at the most and that's stretching it out there.

Supplies:

  • paperback book
  • exacto knife (optional: I carefully just tore mine off)
  • Scissors (optional)
  • glue gun/glue
  • mod podge
  • glitter (optional)
Enjoy! See you tomorrow :)

Saturday, December 17, 2011

Day 17: Camera Strap Cover

I can't help but be excited for Christmas and spending time with family. Last night my husband and I went to the Holiday Train that came through town and it was so much fun. Really gets you in the spirit of Christmas. (The Holiday Train is pretty special to us because 3 years ago we got engaged that night)

I am also relieved I finally got the last of my packages sent out. So everyone will get their presents on time :) And today we are having our annual gingerbread decorating contest with the Howe cousins. It gets a little intense and usually the "big" kids end up being a little too competitive. Stay tuned for pictures and to see who won!


I have been wanting to make one of these babies for a long time but unfortunately this is not for me. Hoping after Christmas I will make one for myself. Maybe even this exact one. Love, love the colors and how this turned out. So fun. Purple is my favorite :)

Supplies:

  • fabric
  • cutting mat/rotary cutter
  • sewing machine and thread
  • batting (optional)

Cut 6'' x 30'' piece of your body fabric. Two strips for ruffle fabric 1.5'' x width of fabric and 2.5'' x width of fabric. 

Fold a 1/4'' seam on both sides for your ruffles. Do this for both strips of fabric. Stitch along the fold. This is to hide the raw end and prevent it from fraying. (see picture below)

Once you get your seams sewed. Then you will want to sew down the middle of each strip to create the ruffle. When sewing down the middle make your stitch length as high as your sewing machine will allow you. I had my stitch length set to 5.0 (see picture below)


When you get both of your strips sewn down the middle. Take your top stitch and pull gently. This will start creating your ruffles. (see picture below)


Pin larger ruffle about a 1/2'' from edge of body fabric. You may have to adjust your ruffles. Once you get the larger ruffle sewn pin and sew your second ruffle on top. I sewed right next to my thread that made the ruffle. When I got done I gently pulled the loose thread with a ripper. This was my personal choice feel free to do what you want. I just thought it gave a much better finishing look. 


This is optional: I cut a piece of fabric to fit the body of the fabric. The batting allows for a little cushion on your neck. Pin fabric and batting together. Fold under 1/4'' seam on both ends of fabric. Sew to make a finished edge. 

Once you get your batting sewn and in place. Fold body of fabric right sides together. Pin along the long edge. Sew down the long edge using 1/4'' seam allowance. Remember to back stitch at start and finish. You should now have a long tube. Flip your strap right side out and iron edges. Sorry I didn't take pictures of this. Please let me know if you have questions. 

You can choose to be done at this point. I decided to add a few rosette flowers. 


Enjoy! See you tomorrow :)


Friday, December 16, 2011

Day 16: Ear Warmers


Who says you can't look fabulous and be warm! I just love these fleece ear warmers. I know I say I love everything I post on here but I do so much!


Check out this great TUTORIAL on how to make the ear warmer and for other ideas.
Also the tutorial to make the flower is found HERE.

Supplies:
  • fleece/felt
  • scissors
  • glue gun/glue
  • sewing machine
  • needle/thread
  • printable template which you can find HERE
Adjust the band to fit your head.


The Bow Ear Warmer tutorial is found at the same place as the printable templates HERE!

Enjoy! Stay warm and See you tomorrow :)

Thursday, December 15, 2011

Day 15: T-shirt Scarf

Ok so I am in love with the new rave of T-shirt Scarves. I have looked many places trying to find one to buy but I haven't really found anything that I like. So the DIYselfer I am decided to find a tutorial on how to make them. So here ya go! Merry Christmas :)


Supplies:
  • plain t-shirt (goodwill is where I found mine)
  • scissors
  • embellishments (optional)
  • needle and thread (optional)

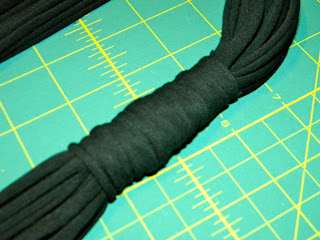
Start out with a plain t-shirt.


Cut top off (under armpits) and also cut off the bottom hem.


Cut approx. 1'' strips


Stretch each strip. No need to be gentle ;)


Gather together all of your strips except one and stagger them. That way when you wrap the remaining piece to hide the seams it won't be so bulky. I started at one end wrapping and when I got to the other side I tied off into one of the strings and tucked it up into the already wrapped part. You can choose to wrap yours however you wish and you think is easiest (tie, glue, sew, ect.)


What mine looked like with the seams wrapped and hidden. 


You could add some texture by adding a braid. 


Or add an embellishment to dress it up. 


The grey scarf I did a little different. Since this grey shirt didn't have any seams on either side what I did was cut approx. 1'' strips but leaving about an 1'' uncut at the end. See picture below. You can decide to either leave the uncut part visible or you could wrap the uncut part. Your choice.

If you decide you are going to wrap them you need to make sure and cut an extra strip off. Stretch each one out like the instructions above. In this scarf I cut an extra strip off because I wanted to add a braid. So what I did was tied it into two strings and started braiding until I got to the other side of where your "seam" would be and tied it off again. You don't see the ties because I then wrapped another strip around. You can see where I wrapped this one in the first picture.


Please let me know if you have any questions on how I did anything.

Enjoy! See you tomorrow :) 

Wednesday, December 14, 2011

Day 14: Homemade Sugar Scrubs

Feeling the winter blues along with dry skin. This is a perfect, cheap and easy gift to make for someone on your Christmas list or even for your self.


Lemon Sugar Hand Scrub

2 1/2 cups Sugar
1 cup extra virgin olive oil (can use sunflower oil)
4 tablespoons lemon juice

Check out this great hand scrub along with the rest of what you will need to finish here. Give it the smell test and if it doesn't smell too lemony than add more lemon juice :)

I have a jar of Lemon Hand Scrub sitting next to my sink. This would also be great for the guys out there.

The scrub does separate so just make sure to mix well before using.

Brown Sugar Body Scrub

2 cups brown sugar
1 cup granulated sugar
1 cup sunflower oil
1 tablespoon pure vanilla extract

Check out the brown sugar body scrub here.


I have packaged both the scrubs along with hand cream, body cream and the rice therapy bag I made a few days ago. If you missed that check it out here. The perfect pampering gift for someone special.

Enjoy! See you tomorrow :)

Tuesday, December 13, 2011

Day 13: Scalloped Felt Wreath


I saw this on Pinterest the other day and love, love, love it. The colors and the scalloped edges make it so simple but different and fun. I chose to use the same colors that were in the tutorial but you could change it to what you like. This wreath took me about an hour with tracing, cutting and gluing. I should say that my husband did help trace and cut most of the pieces (thank you sweetie). I have been so busy flying around here working on orders and getting things done with the madness of Christmas and he is trying to step in helping out with things he can :) Yes, I am one lucky lady.

Supplies:

  • Foam Wreath (any size)
  • Felt
  • Scissors
  • Scalloped Template (make your own)
  • Glue gun/glue

Check out the tutorial here and while your at it make sure to check out her ADORABLE blog. Love it!


Enjoy! See you tomorrow :)